Sunday, July 24, 2016

New Summer Jacket

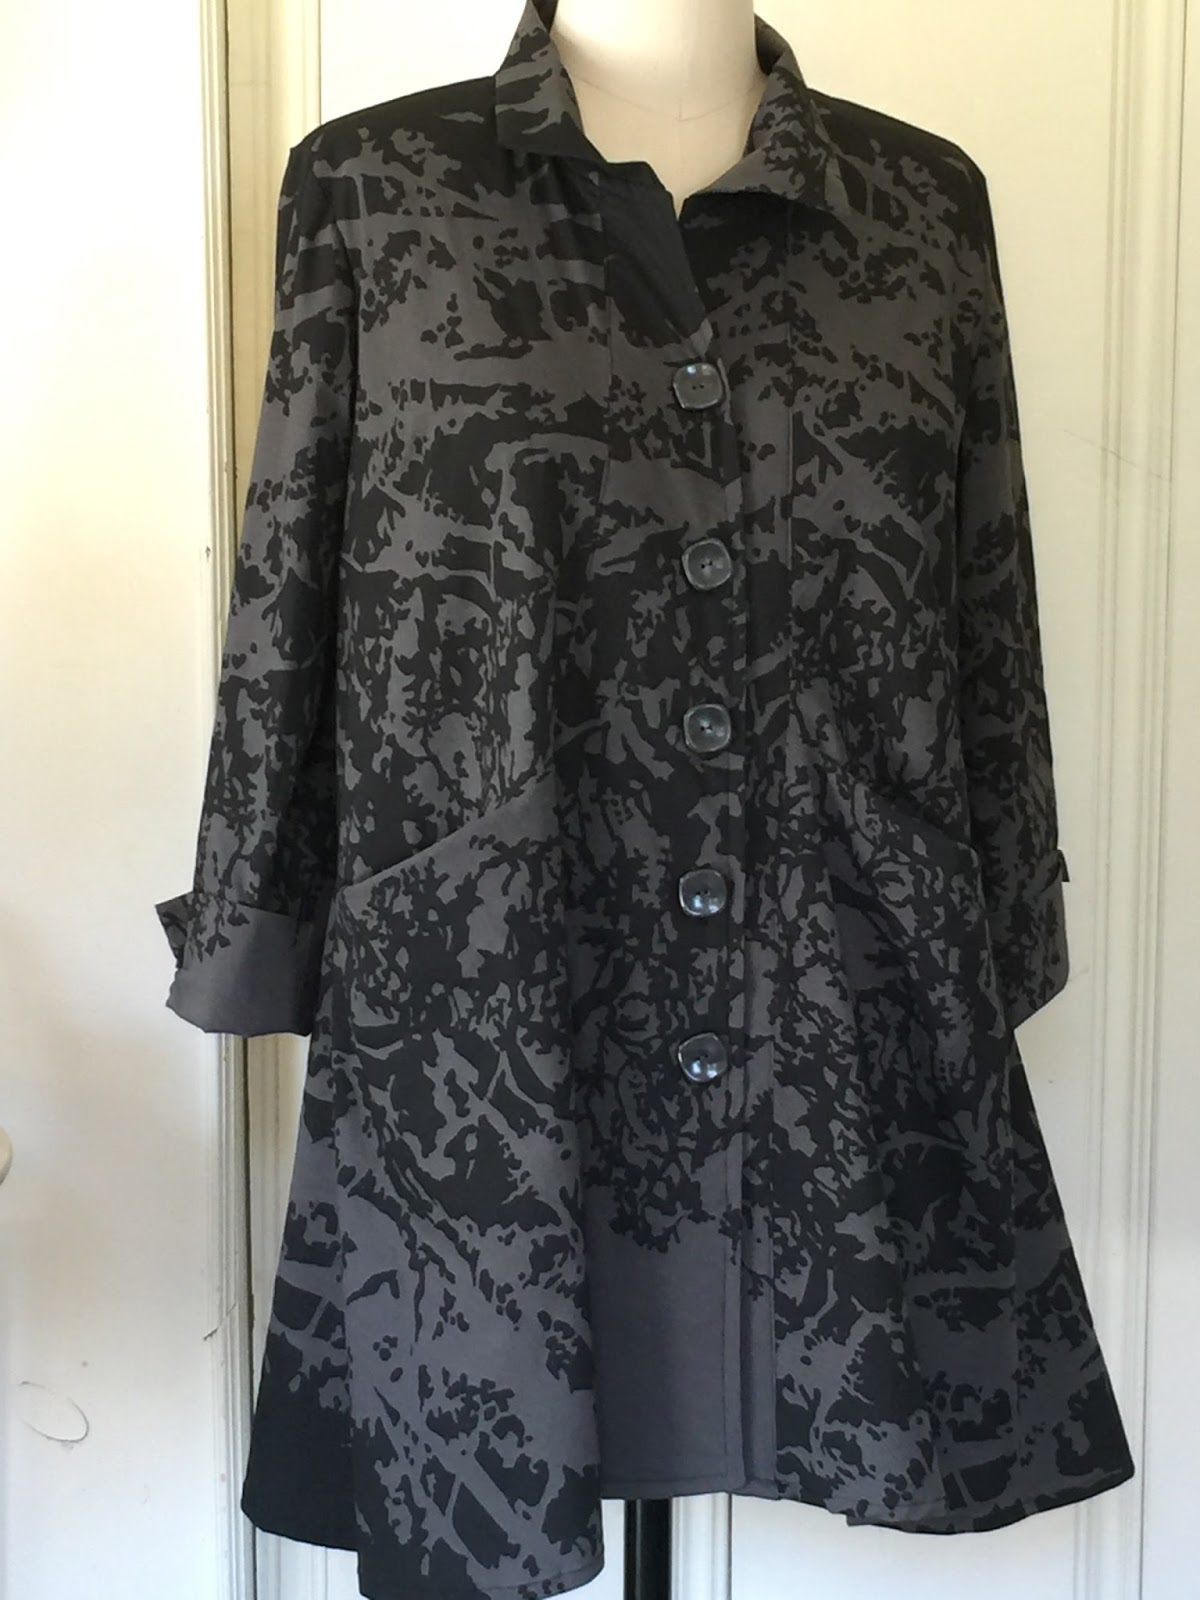
This jacket has a slightly Asian lines...that is if you can see past the wild colors!  This cotton/linen blend fabric is Japanese Echino by Etsuko Furuya but it somehow does not lend an Asian accent to the jacket.  In fact, I've been saying to my sewing pals I might have to join the circus when I wear this!

But they assure me that if I wear it over black (yeah, that works for me!) and wear a cute shoe with it I'll be fine.

I'm going to listen to them and wearing it to a one man show about Peggy Guggenheim next weekend.


This is a self drafted pattern from a RTW garment that my friend owns.  I love the collar.  And the pocket detail is not only comfortable but really adds to the unique lines of the garment.  I hope you can see them because, by complete accident, I matched the pattern pretty well.  I wasn't really trying very hard because I thought it would work no matter how the print fell.  I didn't have a lot of choices in laying out the pattern because I only had three yards and this pattern should have taken about 3 1/4 yards...but I squeezed it out.  I had about 5 square inches of fabric left!

If you look closely you can see a little dash of lilac on the upper right shoulder, that's the selvage, I had to use a little.  I like it.  I wanted to use more of it on the inside front facing but couldn't get it to work.


My husband asked, "How many fabrics did you use in this one?".  Ha!  That's the beauty of Echino, it gives you so many layout choices.


Anything with a bird on it is ok with me, despite what Portlandia did for (or to) this image!


The back neck detail is really nice, too.  One side overlaps the other.

One thing I need to get better at is topstitching.  I think I need to futz with the presser foot tension to get a more even stitch...and take slightly larger stitches.  And I'm going to use topstitching thread next time.  This jacket didn't call for it because of the craziness of the fabric.

My friend made it in denim with red topstitching which looks sharp.

I follow a lot of blogs, they really inspire me.  One that I follow is Wendy Franzen's blog, West Zen Studio and was gobsmacked by her latest post.  You have to see this jacket she designed and made, it's just so gorgeous!  Congratulations, Wendy, what a feat!

I'm headed out to the garage to paint canvas for a new purse...stay tuned.


Sunday, June 12, 2016

This week's wrap up

I've been making some pretty simple tshirts for an upcoming trip and decided to try something a bit more challenging.  I'd seen Nancy Murakami wearing Vogue 9174 in Marcy Tilton's Puyallup booth this last March. Hers was a crisp white version. You can see it and another gal's version in this blog post by Marcy Tilton.  
I had a great time making this.  The instructions are very good and it went together easily.  It takes a bit of time to cut out and make since most of the pattern pieces are cut single layer but I think it's worth it.  I made the shorter version because I didn't have enough fabric to make the longer version.  I didn't add the second, standup collar for the same reason.  I goofed on reading the pattern pieces and made the fronts and back different lengths.  BUT, it worked and I like the irregular lengths.


The fabric is an Indian cotton (I believe) that I got in Marcy's booth.


I love the angled buttonholes.  I've been wanting to use this design detail for a long time.  I first saw it  on a shirt made by Katharine Tilton.  The buttons were purchased at DressSew, a wonderful fabric and craft store in Vancouver, BC.  It's a wild place but the prices are incredible.  These buttons were 2 for 25 cents Canadian, which is 25% less in US dollars!

I also did some red stitching at the hem and sleeves.  


I'd like to make a white one for the trip but I'm running out of time!


Here's a fun little bag.  I found the pattern at Hart's Fabrics in Santa Cruz.  I ran into a friend, Leslie, who used to work there, and she told me how fun it was to make so I grabbed it.  Turns out it was the perfect thing to bring to a Quilt Away I attended in Oregon last month.


I used several pieces of vintage kimono silk that I purchased in Tokyo a few years back.  They were my favorite pieces (and I got a lot of pieces!) so wanted to use them for something special.


This was like a big rubik's cube to make but as Lesley told me, "Just follow the directions one step at a time and don't think too much!"  It worked.


Here's the front of the pattern.


And here's where you can buy it online.  Or, Hart's will sell it to you online,  I'm pretty sure.


And finally, I thought you might like to see these adorable dog cookies my head baker, Teal, made for yesterday's opening of Capitola's new dog park .  Aren't they adorable?  Teal is amazing!

Saturday, June 4, 2016

Variations on Vogue 9193 and Travels

I took a class with Gwen Spencer in March that was focused on creating fabric from scraps.  It was such a terrific class for so many reasons.  Gwen is an inspiring sewist...well, she might call herself a seamstress, not sure.  You can see her in Marcy's blogs sometimes and even does a video or two in Marcy's studio.  She's so talented and a great teacher.  She used Marcy Tilton's V9193 pattern so that we would all have the same structure to work with.  

Most of the fabrics I used were stretch woven.  It made it a bit trickier because of the stretch but it worked out.  I made the sleeveless version which falls slightly over the shoulder.  I fell in love with the pattern.  First, it's really simple to construct.  Second, it's so versatile.  I really like the pocket detail and the fact that it dips just slightly at the hem on the pocket side.  I enjoyed making it so much I made two more!


I did quite a bit of hand stitching with Pearl Cotton to give it more definition.  I also machine stitched some vertical lines to give the pocket area a bit more body.

It's all about raw edges which I love.

The back is a bit less stitched.  The long black strip is cotton jersey that I stamped.

Details of the stitching

More stitching details.  I did some with regular sewing thread but stitched by hand.  I'm getting very fond of that look.

The next one I made is from a fabric I got at  Fabrix in San Francisco.  That place is a gold mine.  But you take your chances; sometimes I go out of there with armloads, other times with nothing.  The owner buys designer fabrics that are from past seasons.  There are some real finds.
This cotton digital print...I think it's digital, I'd seen on Gwen's tunic and my friend Mary Boalt made a very cool jacket from it.  It's really fun to lay out and try to figure where all the jean jacket pieces should go.
On this version I added the dolman sleeve, I like it because it's not too bulky, something I've always steered clear of in most dolman sleeves.  The bottom third of the sleeve was a bit narrow for me so on the following version I added 1/2" on all sides to give it more room.

I decided on the next one I would make it slightly longer and put another pocket in it.


So here is the last version in another Fabrix buy.  It's a slightly see-through black and grey with cut out pieces of fabric sewn on.  It looks so Japanese although I don't know where it came from.

I lengthened the top by 1" and the bottom by 2".  I also added pocket on the other side.  My right hand felt left out!
I'll make this again, probably several times.  I can see it in jersey, stretch woven, corduroy, organza, stretch velveteen, velour, fleece... anything.

I'm extremely glad that Gwen used this tunic for the class project.  I'm thinking about taking this and one more on our upcoming trip to Amsterdam and the Baltic Countries.  I'm gonna need a bunch of clothes on this trip because the weather will be very changeable.

I just started sewing for the trip.  Why do we like to have new clothes for travel?  It's not like anybody's looking!...

And I'm going to take jewelry this time and WEAR IT a la Margy from Fool 4 Fabric.  I love her travel wardrobes.  She doesn't hold back.  She wears hats, jewelry and looks terrific.

You might give this pattern a try.  Don't be dissuaded by how it looks on the pattern cover.  I don't think it did the design any favors.


I just got home from a 10 day textile junket.  It began in Tumalo, Oregon where I am invited each year to a Quilt Away.  A group of talented, extremenly fun women get together each year, most of whom are quilters.  No quilts for me but I did manage to get two project done in the three days.  One was the black and grey top above and the other was a very cool little carry case.  I'll show you picks of that soon.

Then I took a little road trip up to Seattle to join my friend Sharon on another leg of the journey to Vancouver, BC, for a MAIWA class on eco-dyeing, contact printing and indigo dyeing.  


The first day we were asked to go out and forage for dye materials.  These are the little piles of found vegetation.  We were not allowed to pick anything, of course...good conservationists!

This moody photo was a bit of the huge selection the teacher brought.


Here's Sharon getting excited about the first "reveal".  Eco printing necessitates leaving your "bundles" to steep overnight for best results.  Hard to do but so worth it.


Our fabulous teacher, Natalie Grambow.  A super good teacher who knows how to impart her extensive knowledge in natural dyeing in all it's many applications.  I'd take another class from her in a minute.  The only thing I would say about the class is that it had a few too many people in it for the space allowed and the type of class.  Poor Natalie kept up but she must have been pooped at the end of each day.

Merino wool jersey sample ready for the dye bath.

Some of my samples.  The green one in the middle is the result of the previous photo.

The purple is from logwood.  We did some shibori, too.

We dyed beautiful watercolor paper, too.  


Then...
Sharon and I came back to Seattle for a relaxing day before she headed back to work and I flew home.  High on our list was a visit to the Seattle Asian Art Museum for their Mood Indigo exhibit.  It's small but worth seeing.

Sharon is inside an indigo installation by Rowland Ricketts that was accompanied by sound artist, Norbert Herber recordings.  We got lost in this little room for a long time.  The combination of being surrounded by a "drum" of hand woven cloth that was dyed indigo while listening to the sounds of the process was haunting.  The music ebbed and flowed with our movements.

There were many quotes in the show but I loved this one; from one of my all time favorite books.

A piece from the show, delicately stitched, I couldn't quite figure out how they did it...flat fell, I guessed but then it didn't really look like that close up.

This design could work today.  Love the buttons with the red loops.

Here's a little rabbit that was on a kimono.  He was accompanied by several other rabbits doing various things, all of which had meaning.  Here is a description I found on the interwebs about the meaning of rabbits in Japanese Culture.

 In Japanese tradition, rabbits live on the Moon where they make Mochi - a popular sticky snack.
The rabbit in the moon is lifted out of Japanese myth. Representing the female principal, which meant divine inspiration in spiritual or creative matters, but folly, mania, or death in everyday affairs.
Tsukino Usagi means "Rabbit of the Moon."
The Moon rabbit, also called the Jade Rabbit, is a rabbit that lives on the moon in East Asian folklore. The legends about the moon rabbit are based on the traditional pareidolia that identifies the markings of the moon as a rabbit pounding in a mortar. In Chinese folklore, it is often portrayed as a companion of the moon goddess Chang'e, constantly pounding the elixir of life for her; but in Japanese and Korean versions it is just pounding mochi.
The earliest records suggesting that there is a rabbit on the moon appears in the Warring States period in ancient China. The Chu Ci, a Western Han anthology of Chinese poems from the Warring States period, notes that along with a toad, there is a rabbit on the moon who constantly pounds herbs for the immortals. 


I liked the stitching on this one.

And this one for the printing pattern.

That's all for now. 


Tuesday, May 17, 2016

Trying To Get Some Color In My Life....Not!

Although I've purchases several lengths of fabric that have a lot of color I don't seem to be using them. I think I've developed a fear of color in clothing.  I'm working on that.  In the meantime the best I can do is a bit of white...


Yes, it's another of Marcy Tilton's V8709 now sadly out of print.  I make this all the time, it's so versatile and really works for me.  This is made from a lightweight stretch cotton from Marcy's collection.  It's 3/4 length so can be worn with skinny pants or leggings, or a long skirt.


Here's a fun tunic/dress from a top pattern that I lengthened.  Fabric from Marcy again.  One side is straight and the other has an angular whoop-di-do.  It hangs closer to the body on me but does have some pouf to it.  I'll wear it with black or white leggings.  


I added this little pocket that is easy for my hands to slip into.  Much easier than an inseam side pocket.  Does anyone know the name of this type of pocket?  Shams, I'm talkin' to you, girl...your the pro at knowing the answer to most sewing questions!


I've been trying my hand at making cross body purses that I use while traveling.  This one is made entirely of scraps and stuff I had.  I didn't use a pattern.  I think there's more stitching that needs to go on the large grey shape to the lower left, I'm thinking in black, maybe a couple of concentric circles.  

The straps are bicycle inner tubes sewn to a laser cut vegan leather I got a couple of years ago.  I haven't been able to figure out how to use it up until now and realize it needs to be used homeopathically.


Here is the back of the same bag, using more of the laser cut vegan leather.  The tassle is made from the bicycle inner tube.  The jury is out on this bag.  I'll wear it a couple of times to see if it likes me.


And here is the bag I just finished.  It's from an Etsy pattern from the shop called SaGranny but I don't think she is carrying it anymore.  The designer is Ginnie Kelly and the bag is called A Cute Bag.  I saw it on Pinterest and tracked it down.  The pattern is challenging but fun and went together pretty well except I must have read the instructions wrong because the outer zippered compartments open onto the lining!  Oops, I'll have to figure that out next time.

Made this one of grey denim, should have used a thinner lining, too much bulk.  But it's going with me to Oregon, Washington and Vancouver in a couple of days to be road tested.

Bon Voyage for now. 

Tuesday, April 12, 2016

Muslins & Mixed Nuts


I've been doing a lot of sewing in the past couple of months but it's mostly been making muslins to try out new patterns.  Everything seems to be a good start and maybe not quite done.  I'll show you.


While at the Puyallup Sewing Expo last month we stopped by a booth with several Japanese cottons.  We all bought one or two pieces.  I wish I remembered the name of the company and the gal who was the owner because she was so nice to us.  She was wearing a tunic made from one of the cottons that I fell in love with.  I bought the cotton and she graciously offered to let me copy the pattern.  It is a Japanese pattern, I have no idea where you would get it.

I ran over to another booth, bought a roll of pattern paper and my pals helped me find a secluded table to lay it out and trace it.  That might be a first!

Here you see my muslin with some fabric I had on hand.  The front is a Japanese cotton.  I had 1 yard of this (intended to make Diane Ericson's Faultline Vest....I never did but still intend to make it!)  The back is a stretch woven that I appliqued a few of the front fabric motifs onto.

One of the things I like about this, which you can't really see in this fabric, is that the back wraps around to the front at the hems.  When I make it in the Japanese cotton I got you'll see what I mean.

This doesn't look great on the dress form but I think it's more flattering on.  And, it makes up in about 2 hours.


I like this pattern and with our weather changing to warmer summers I think I'll be wearing it a lot.


Here's another pattern I got in Puyallup.  This one is The Sewing Workshop's Fillmore Duster.  They were so kind to let us try on their samples.  Such a gracious thing to do.  I made my muslin from scraps.  It went together easily and was fun to make.  When I make it again I'll either change the collar or make sure it's made with a stiffer fabric.  The collar just sort of lays there with this lightweight knit.  Could-Woulda-Shoulda interfaced it!


I think I'm going to silk screen a little black onto the light grey stripe and carry it up to the left top a bit.  Seems like too much blank space.

Onward into spring and more lightweight sewing projects!


Wednesday, March 30, 2016

Making Cloth-Part One

It seems like everything I've been doing lately, in regards to sewing and design, has to do with using  small pieces of fabric that I've saved.

As you probably know, if you've seen any of my posts, I'm fond of black, grey and white.  So, most of my stash goes together!  That's the good news.  The bad news is that as much as I use these remnants, they just keep growing, it seems!  I feel like it's Linus' blanket, I keep using smaller and smaller pieces!

Not to digress but my sister used to sit outside under the clothes line on the day her blanket was washed.  She would drag her little chair out there and wait for it to dry.  The "it" got to be about 5" square before my mother "lost" it.  Sibling similarity...I just can't give up on my scraps.

So, at this year's DOL in Santa Barbara I wanted to drape a dress using my TNT pattern for a knit top with various stretch woven fabrics and other knits draped on the bottom to make a dress.  I brought my traveling dress form....she's quite a bit smaller than I but serves as a fluffed-out hanger of sorts.

I cut the top out of a stable black knit and worked down from there.  I regret not having taken any photos at the time so all I have is the finished piece.  I had a lot of help from Diane Ericson, who dropped by every now and then, plus I pulled her in whenever she passed by.  And plenty of help from Jenny Freedman, the class angel who worked with me really closely, invaluable!

And here's what I came up with.  I wore it to bookclub last night and I think most of them got it but you never know...


It feels really comfortable on and so I think I'll wear it a lot.  I wore it with grey capri legging because it's high (above my knees) on one side.


As you can see, there's a large dot fabric with huge pockets in the front and back.  I used an already made top that I don't wear anymore because my sewing pal, Janet, told me not to.  I did not argue.  It went into the fabric pile. 

I cut the top in two pieces and the sleeves became the pockets.  I'm lucky, I have skinny hips so I can bulk up in that area..I won't mention what I'm NOT lucky with...so the pockets help my profile...at least in my fantasy world.

Here's the top I cut to make the pockets.


I added three dots at the top of the dress to tie in the prints on the bottom, plus, there was just a bit of stretchy ugliness right there so...

The neckband and the sleeve bands came together really fast.   I wanted a little heft since the rest of the garment is pretty weighty.  I cut a 3" band of lightweight knit, doubled it, sewed it to the right side of the neckline with 1/2" seam allowance and then turned it to the inside encasing the seam allowance. Then sewed it down, stitch in the ditch style.   Sometimes you just get lucky.


I wore it with the Cutting Line Designs vest pattern I'd made a few months ago.  It looked better on my body than it does on the dress form tho.  There was a bit of the black bodice peaking out at the bottom of the vest.  I love this pattern, super easy, quick and adapts to so many fabrics.  I've just finished it in a http://marcytilton.comMarcy Tilton crazy laser cut neoprene.  As soon as I've figured out what to wear it with I'll show you.

I've just finished a wonderful class with Gwen Spencer, who works with Marcy Tilton on bringing her designs to life for Vogue Patterns.  She's a genius when it comes to "making fabric".  Her approach is subtle but so dynamic and balanced.  I'm still working on the top I made in the class.  More on that in Making Cloth-Part Two.

In the meantime, enjoy wisteria season!