Wednesday, December 21, 2016

It's been a busy fall and early winter around here.  This post will be a grab bag of all the things I've been doing and working on.

Here's the latest version of a pattern I've made three times now.  It fits me to a T, I love making it and I can now whip it out in about four hours.  It's Marcy Tilton's Vogue 9130.  I think this could be flattering on lots of figures.

This fabric is a heavy cotton jersey I got at Fabrix in San Francisco (so I can't tell you for sure what the content is, they don't have labels on their bolts).  It's a huge print so I thought breaking it up into smaller parts would be wise.

First let me say, THANK YOU INDIA FLINT!  You have been a huge influence on me in many ways.  Not the least of which is my ongoing practice of eco printing.  I am humbled and inspired by you constantly.

Knowing I could do something with it my pilates instructor gave me a cashmere sweater that had been left in her studio for months.  I've been working with cashmere for about 12 years now, using various methods of construction.  For the past year I've been using every light colored sweater I have, or could lay my hands on, to eco print.  This latest acquisition got me started again.  Back to the dye pots.  Since it was fall many of my tried and true leaves were available again.  Eucalyptus and nectarine leaves are two of my favorites.  But I had many other dried leaves that worked as well.

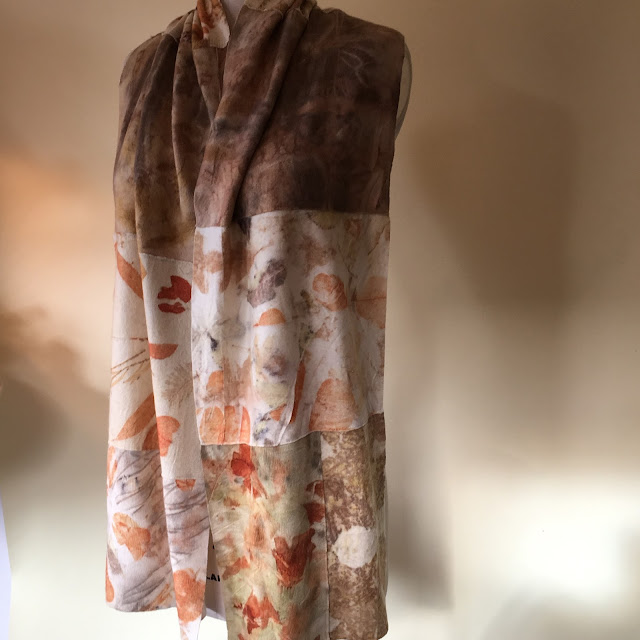
I hadn't been able to figure out what to do with the huge selection of previously printed pieces in my stash.  I had whole sweaters and smaller bits.  I've been taking them out, fondling them, refolding them and putting them back in a pile for about a year now.  I finally concluded that using them in a whole sweater wasn't for me.  So, I cut them all up (it stopped my heart for about a split second) and made scarves out of them.  I think I was feeling like they were too precious to cut into.  Wrong!

Wow do I love them!  I think the piecing is a really good way to show off the individual marks.   

This one is hand sewn using Valdini purl cotton.  It's a very satisfying process to pick each piece and work with it.  Another big plus is that you can still smell the plant materials.  Especially the eucalyptus!  This piece is mostly nectarine leaves.  They start out orange and yellow but dye green, my favorite dye color!

Here's my favorite piece.  It's nectarine leaves again.  They were in various stages of dying, some yellow, some orange some green.

I played around with sizes.  I like varying them but mostly using larger ones, these got a bit too small.

Here you see most three types of eucalyptus, onion skins and dried crocosmia blossoms.  I machine stitched these and like this look a lot.  I used my walking foot which made it a cinch.


I steam most of my pieces.  It gives a more exact print, which I like.  But I love the watercolor effect on this middle piece.  It's submerged in a water bath instead of steamed.  Among other things there are plum leaves, oak leaves and onion skins.

Sorry for this dark shot.  I did most of the dyeing on this one so long ago I can't remember what each piece had on it!

Same here...should be writing these things down but that's just not who I am.

That's all of the eco printing for now.  

Random... but I couldn't resist showing you a piece of sidewalk art.  It wasn't meant to be that but it looked so beautiful to me.

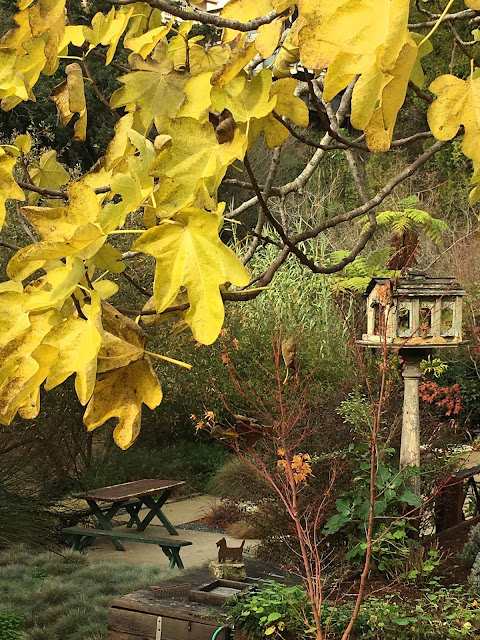
We had quite a nippy fall this year on the Central Coast and the leaves all turned brighter than usual.  Here's a shot of the Spirea looking towards my studio bunkhouse.

And the giant fig turning it's glorious yellow.  It's great for eco-printing, too.  It makes a shocking yellow.

And the stand of Japanese maples turned better than ever!

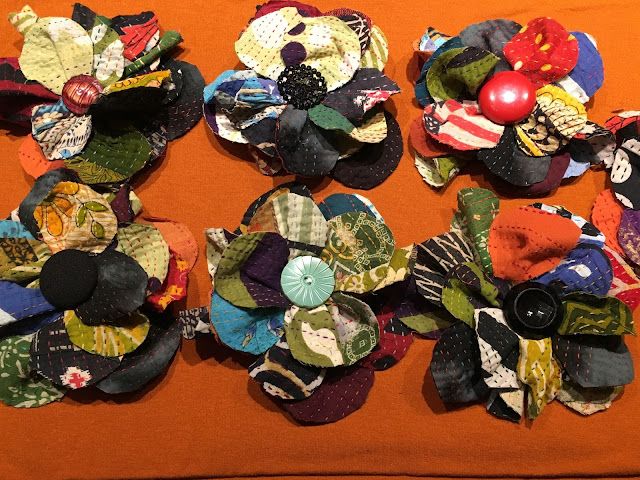
On to the holiday.  My Sewing Guild has a holiday sew-in every year where we exchange gifts.  They are the best gifts cuz these women KNOW what we all like!  I've been wanting to use my kantha scraps and decided to make a flower pin to go on each package.  

I had so much fun making them.  And I used some of my button stash.  I'm determined to use what I have and not buy stuff!!!

Here's how I made them.  I cut three different sized templates for petals, then I cut out 5-7 of each size in the kantha cloth.  I sewed each of the petal sizes together at their bases, end to end, with a basting stitch.  I gathered them so that they formed a circle and layered each petal circle one on top of the other.  Then sewed them all together and sewed the button on.
I glued a pin back to black felt and glued that onto the flower backs. They were pretty darned cute on all the packages.

And finally, I tried to include a video I took of the holiday window at Molly b's on 4th Street in Berkeley. But my post wouldn't send with it attached so just go to their website and check it out!

Have a warm, loving and delicious holiday!
PS...the preview feature is not working on Blogger.com right now so if there are errors here please forgive!
Sunday, November 27, 2016

Holiday Weekend Sewing


I've had this entire weekend without a single plan except a wonderful raucous Thanksgiving dinner with 17 friends.  So what does that mean?  Time to sew-sew-sew...and listen to a book.  Plus, it's raining here on the Central Coast of California, finally, and it feels so good to sit inside and listen to the rain.

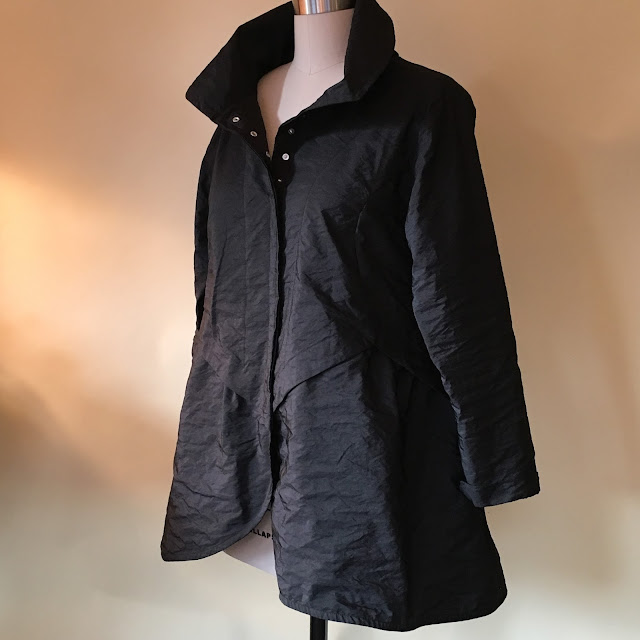
I finished Marcy Tilton's Vogue 9230 which I'd started a few weeks ago.  I loved making this jacket.

It's not easy.  And I wonder where Vogue lists the difficulty level now?  Is it the colored symbol?  I couldn't find it on the package.  That doesn't mean it's not there...I know someone will tell me.  I can't find it on their website either.  I think this must be average or maybe somewhat advanced?  It's tricky but fun.

I used a unique fabric that has metal woven into it so it has a strong opinion about where it wants to wrinkle, twist and turn.  It's easy to sew with but feels sort of like wearing armor!  It has every chance of being rain resistant but I don't think it really is, darn it.

The tricky part of the pattern is where the bottom pieces fit onto the top of the jacket.  It's do-able though, and is very unique.  I could see this being flattering on all kinds of figures.

Because of the sticky-outie nature of this fabric the bottom back pieces needed to have the pleats sewn down.  It worked fine and you may want to do that with the fabric you choose since there is quite a bit of volume in the bottom.

I love the collar, plenty of drama here.  I auditioned button after button but maybe I just have button fatigue or something, none of them seemed to work.

I've been wanting to use this snap tape for years now and it worked well on this fabric and shape.  
When I told my husband I'm going to get a lot of wear out of this garment he laughed.  What the...???  I couldn't figure that one out....but yeah, I will wear this often.  It's comfy and stylish, my kinda combo!

OK, here goes with this one.  Yes, this is a Diane Ericson Faultlines Vest, and yes, it's made out of men's slacks.  While I was at DOL last month one of the attendees brought in a big bag of fabrics to give away.  I swooped in and got several wonderful pieces, thank you Lucy!  Her husband's worn out khaki slacks were among them.  
I've had them on the dress form in every angle you could think of.  I knew I wanted them to be upside down.  Finally, the Faultlines pattern came to mind and it worked.  The layout was tricky.  I got almost all of it cut out in the fabric but had to use another fabric for two of the lining pieces.

Boy, men's wear is made so that it will survive any disaster you throw at it.  Just "unmaking" these pants took hours.  

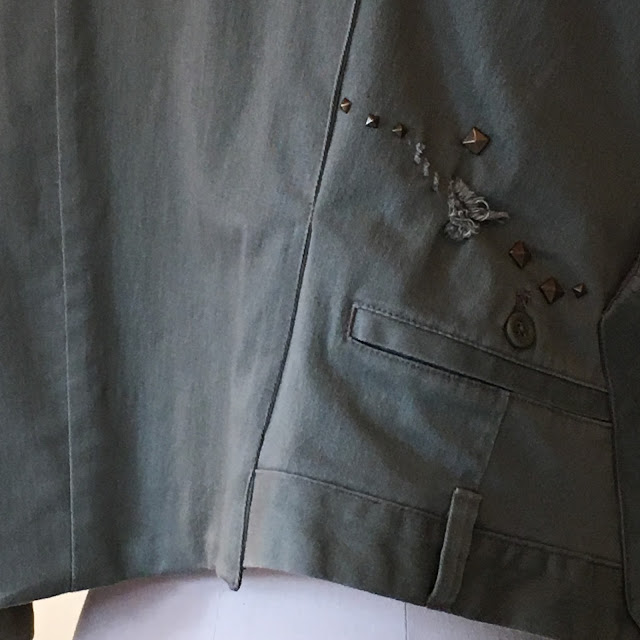
I wanted the vest to be as lightweight as possible so I took out all of the pocket linings.  I also ripped out the clothing designer's symbol and put a bronze stud in it's place.  You can see it just below the upside down pocket.

I think the fly is hysterical.  It will be interesting to wear this and see what people say.  Will they notice?  Will they say something or just walk away...??


You get a glimpse of what's going on in the back here but...


Here's the close up.  There was the hole just below his back pocket.  That's probably why he threw them out.  I didn't feel compelled to cover it.

I just couldn't think of anything that would look right so I left it.  Finally decided to use more studs to bring even more attention to it.

I'll give this puppy it's day out soon and then decide if I really want to wear it.  The process alone was fun though!

I hope your holiday weekend was full of the things that make you the happiest, whatever that might be.

Sunday, November 20, 2016

Runway Inspiration

This last fall's Viktor & Rolf runway show blew my socks off.  I downloaded it over and over again to study the details.  I particularly love the use of denim but the whole thing just calls to me.

I made two efforts at using the weaving technique in the show to some success but, as with so many things that look simple at first, the real complexity of the design has eluded me thus far.

I'm not sure I'll work with it again but I might.  Here are the two pieces I made using their concepts.

The first is Diane Ericson's Fault Lines Vest.  I made it a couple months ago and love the lines.  It's a blank canvas-type pattern.  On the front I simply used scraps of a beautiful red wool.  

 On the back I applied the Viktor & Rolf weaving using scraps from old silk scarves.  The body of the vest is a black stretch woven so I was worried about stretching that might occur if I cut into it.  

I decided to weave the scarf scraps onto a piece of the fabric and appliqué the whole thing to the back.  It worked well and gives the same feeling as if I'd woven it right into the body of the garment.

 I secured each vertical strip with a line of stitching.

I thought the back needed another detail so I added a hint of color at the hem.

My next attempt was on a Levi vest I just bought from a sewing pal.  I kept it simple in the front, only using some of the buttons I inherited from my mother's massive collection.  

In the back I positioned the weaving in the center panel.  A sewing pal, Lisa, was smitten with this technique, too, and had finished a Levi jacket that I admired.  She placed the woven panel in the center back so I gave it a try.  She also lent me some Levy scraps because I have none...being the one who is  always trying to de-stash.  Plus, she gave me some really good tips to make the process easier, like pinning as you go and using an embroidery hoop if your fabric could benefit from it.

  Many of these denim fabrics were so stiff they didn't "bunch" as much as I wanted them to.  I like the thick and thin widths though, and the pieces hanging from some of the edges.  I like the results but would need to really work with this technique to get stunning results.  

Once again I'm reminded that couture fashion may seem frivolous at times but those exquisite techniques are borne out of years and years of experience in the ateliers.  

I admire the men and women who toil anonymously and I think they are, in great part, the reason for the success of the designers they work for.  But, I'm happy to see that some designers are beginning to publicly recognize these artists.  Karl Lagerfeld actually honored them in his fall 2016 runway show.

I'm so happy to wear this vest because of the buttons I used.  I've taken them out and played with them for years, wondering what I could ever use them on that would bring them to life and not be too precious to wear on a daily basis.

 I know some of these buttons like they are family members.  Finally, they have a life outside the button jar!

Thursday, November 10, 2016

Full On Fall

I've had a super busy fall season.  First I attended another Boro class given by Jody Alexander.  Then I took a wonderful eco printing class from Pia Best- Reininghaus sponsored by the talented felter, Marilou Moschetti.  That was fun and I learned a ton.

THEN,  I had an annual sewing retreat in San Juan Bautista with 19 of my dearest sewing pals.  And finally I went to Ashland for DOL (Design Outside The Lines) with Diane Ericson.

She is on fire right now with all new ideas and designs using remade clothing, making components for garments and designing new garment patterns.  I love everything she does.

 Marla Kazell was the guest instructor.  I wanted to take this particular DOL (not that I want to miss any of them!) because Marla would be showing couture techniques she uses in her Koos Van Den Akker-inspired jackets.

She's a terrific teacher, too.  I learned a lot from her.  She's very patient and is really there for her students.  I learned how to make triangular bound buttonholes that you'll see further down in this post.

It was full on fall color in Ashland.  My husband and I rented a condo right in town and had a great time wandering the shops and eating in the fabulous restaurants.  He took in a play and toured the three theaters since he is a playwright himself.  I just took in the sewing design magnificence in the Ashland Springs Hotel workroom.

Just a little glimpse of the fall color.  I regret not taking more photos, it was so beautiful.  


 Diane has a studio in town where we visited one afternoon to paint fabric and schmooze with Miles Frode,  her artist son who paints incredible canvas for making one-of-a-kind garments.  He's also begun making very cool coat pins.

This jeep was on the way to the studio and I had to stop.


 These candy colored trucks are one of my favorite things about driving up to Ashland.  They sit along Highway 5 and give me a belly laugh every time I see them...whaaat??

I came home with two partially completed jackets.  The fabric for this first one is from a double sided cotton; woven on one side with a bit of a waffle to it, and knit on the other.  It's a unique grey-khaki color.  I used Diane's Ventana Jacket pattern.  One thing I like about Diane's patterns is that you can adapt them in so many ways.  I didn't do too much to this one, just fiddled with the pleats and darts a bit and added a pocket to the other side.  I gotta have two pockets...what do you do with your other hand?


The darts make it so you can fit the pattern easily.  I wanted it a bit snug in the back and full in the front.

 My second jacket was made using a very heavy upholstery type fabric from Marcy Tilton.  The pattern is B5891 by Katherine Tilton.  I've used this pattern several times.   Here, I've lengthened it.  

I used three triangular bound buttonholes I made as samples with scraps of the fabric.  I liked the look of them sewn onto the garment so I went with that idea.  They're a bit wonky but I like the look.


The pattern called for in-seam pockets but I prefer inset pockets.   Inseam pockets always feel like they're set back too far for my comfort.

I decided to document how I make them, I hope this mini-tutorial helps if you've been wanting to try them.  Here goes...

First, I mark the position of where I want the pocket to be on the fronts. Using a rounded template I cut out the sides so that there is seam allowance both top and bottom.  The pocket itself should be larger than the opening by about 1/2-5/8" top and bottom.


I like to use a knit for the binding so that there is no need to cut bias strips, but if using a woven you will need about 10-12" of 2" bias cut fabric.  Pin the bias strips to the fronts, right sides facing.

I sew it on using a 1/2" seam allowance then turn the strip to the back, over the seam allowance (don't trim!) and top stitch it.  Cut away any excess on the back and edges.

Finished bias strip.

 I audition pocket shapes (I have several I keep in a file) to see which size and shape looks best.  Above I position it under the side front to see how it looks.  For this pocket back I used a gray velveteen that was stenciled by my friend, Sharon.  I used it for the buttonholes, too.


Before sewing it onto the garment I serge the edges of the pockets.

Sew it onto the garment right side of pocket to wrong side of garment.

Finally, I sew the side seam, being sure to catch the side edge of the pocket.


Close up of a wonky buttonhole.  Marla, I promise to get better at this!!


And here's my new baby.  A sweet little Singer Featherweight.  I bought it at a garage sale for $50!  Another $125 to tune her up and she's a gem.

Sunday, September 4, 2016

Making It Work

 What I love about sewing is that I can make myself new, every-day clothes that work for my body shape, my lifestyle and my ever-changing tastes.  And then, I can also make weird, one of a kind, arty garments that I'll probably only wear once or twice but enjoy the creative part of making them.

Today's post illustrates both of those types of projects.


I was really taken with a friend's version of Marcy Tilton's v9171 pattern.  And since I had it in my stash, and had a nice 3 yard length of her Taupe Bon Mots Stretch Cotton on hand, I set to work.

I cut out a large, should have cut a medium; this pattern is roomy.  But, after finishing the whole thing, I ripped out the center front seam, took two inches out of it, and it looked lots better.

But, I still didn't love that huge expanse of grey across my chest, I'm wide up there and thinner from there down!  I needed another component.  I've always wanted to make Diane Ericson's Fault Lines vest and it seemed like the perfect way to break up the bodice and overall shape of the bell-like tunic.

I'm really happy with the way this turned out and I'll wear them together often.  I'm also going to buy a medium in the tunic pattern because I want to make it again.  It's fun to make and so wearable.

One of the great things about the vest pattern is that it takes so little fabric.  I used remnants for the both the lining and the outside.  The horizontal stripes are from a knit cut so it rolls and a little piece of a stretch woven. I had to put them on because, after I got the whole thing sewn, I realized there were two blemishes on the front that I needed to cover up.  But it worked and added interest.

I like the vest pattern because you can tailor it to your size very easily since the side and back seams are overlapped after everything is finished.  That method also lends itself to hand stitching.  Next time I make this (and I will) I might cut the shoulders a bit narrower.  Although I'll wear it a few times before I make that decision.

I did a lot of hand stitching on this piece. 

Before deciding to make the vest I auditioned a couple of scarves to break up the front.  I liked the idea but it was a good excuse to finally make the vest.

Another scarf idea.  I like them both, will probably wear it this way, too.  This one gets some color into the mix which is good.

And speaking of color...
I started this vest a year and a half ago in a Holly Badgley class.  The fabrics are a canvas and a muslin I dyed turquoise, some of my hand painted canvas that I washed in the washing machine to soften, chartreuse cashmere pieces and orange kantha cloth scraps.

This hung in the UFO files while I tried to see if I even wanted to finish it.  It's pretty wild and I don't think I'll wear it more than once, if that.  But I finally decided to see it through just for the art sake of it.

I did get a lot out of making this vest though.  The biggest lesson is not to add a lot of accent pieces since the overall fabric is so wild.  I had lots of scraps laid out to audition and finally chose not to use any of them.  Just the orange and chartreuse that I already had on the piece worked fine.

The kantha scraps add a lot of texture and immediate age...like this garment needed that!

I made a barbed wire silk screen in a class a couple of years ago and used a scrap of that on the lower back.

It has one pocket I hid in the patchwork.  This is one crazy garment.  I might wear it, I might sell it.  The jury is out.  I looked at it for so long I feel like I'm kinda over it by now!

And finally, here is a little gizmo a friend bought me at Eddie's Quilting Bee in Sunnyvale, CA.  I've used it about a hundred times since I got it.   This is a miracle of a little thing.  It's magnetic so it gloms onto your needle plate wherever you need it, making a perfect guide for the fabric.  Since I can't sew a straight line to save my soul this thing was MADE for me! Thanks, Lisa!!
Happy Labor Day Weekend everyone.  I'm headed to the bunkhouse to sew.


SaveSave